
| 일 | 월 | 화 | 수 | 목 | 금 | 토 |
|---|---|---|---|---|---|---|
| 1 | 2 | 3 | 4 | |||
| 5 | 6 | 7 | 8 | 9 | 10 | 11 |
| 12 | 13 | 14 | 15 | 16 | 17 | 18 |
| 19 | 20 | 21 | 22 | 23 | 24 | 25 |
| 26 | 27 | 28 | 29 | 30 | 31 |
- 윈도우10
- 프로그래머스
- 파이썬
- 녹화프로그램
- Apple
- 코틀린
- json
- unity
- programmers
- Kotlin
- 애플
- Tutorial
- SQL
- 유니티
- 윈도우
- 코딩학습
- neo4j
- Python
- 아이폰
- 튜토리얼
- DaVinci Resolve
- 한글
- graph DB
- 스프링
- kakao
- spring
- 영상편집
- AWS
- 아이패드
- iPad
- Today
- Total
코드짜는 노인네
[Unity] 튜토리얼 한글 정리 (2D Platformer Microgame - Bulid and publish [Play Unity 웹 게시방법]) 본문
[Unity] 튜토리얼 한글 정리 (2D Platformer Microgame - Bulid and publish [Play Unity 웹 게시방법])
ikohong 2023. 2. 27. 07:20[Unity] 튜토리얼 한글 정리
(2D Platformer Microgame - Bulid and publish [Play Unity 웹 게시방법])

1. 웹페이지 게시방법
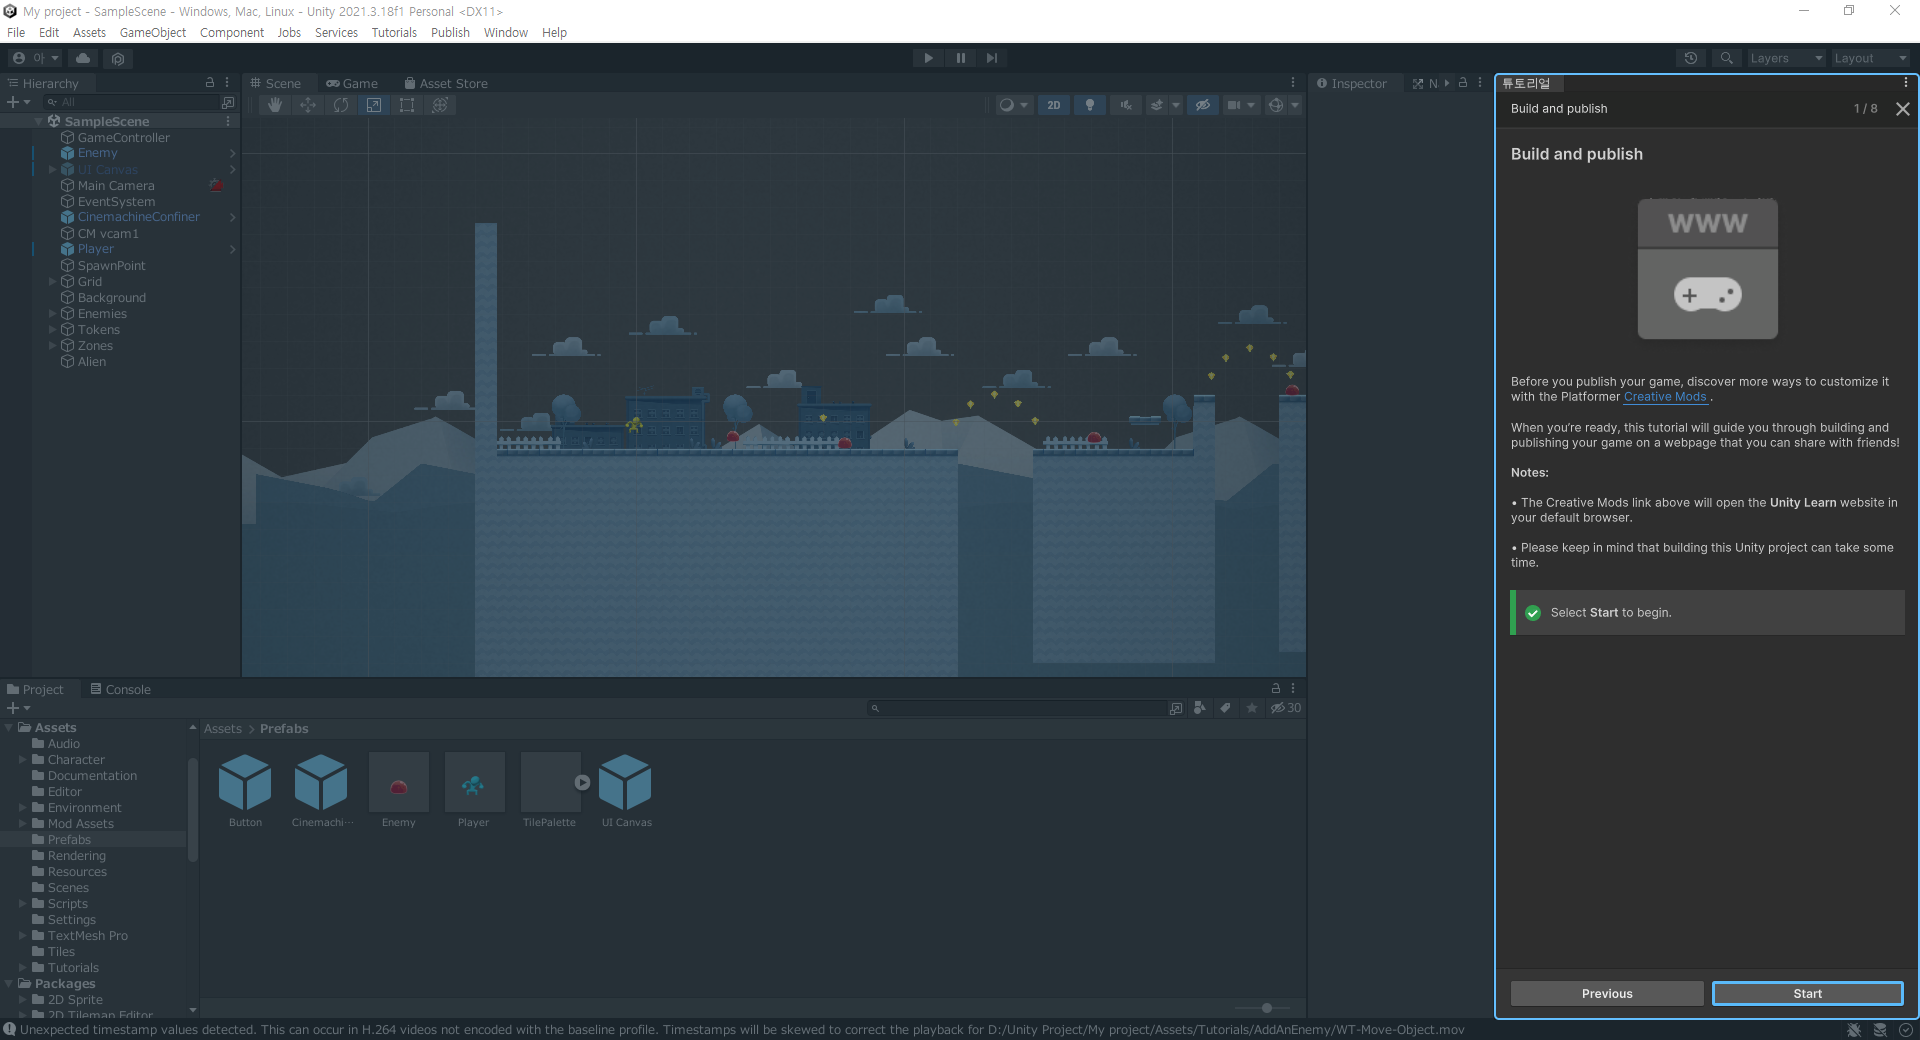
Before you publish your game, discover more ways to customize it with the Platformer Creative Mods.
게임을 게시하기 전에 Platformer Creative Mods를 사용하여 게임을 사용자 지정하는 더 많은 방법을 찾아보십시오.
When you're ready, this tutorial will guide you through buliding and publishing your game on a webpage that you can share with friends!
준비가 되었으면 이 튜토리얼을 통해 친구와 공유할 수 있는 웹 페이지에 게임을 게시하고 게시하는 방법을 안내합니다!
Notes:
주의 :
- The Creative Mods link above will open the Unity Learn website in your default browser.
위의 Creative Mods 링크를 클릭하면 기본 브라우저에서 Unity Learn 웹 사이트가 열립니다. - Please keep in mind that building this Unity project can take some time.
이 Unity 프로젝트를 구축하는 데 시간이 걸릴 수 있습니다.
> Select Start to begin.
> 시작하려면 Start를 선택합니다.
2. WebGL Publisher 열기
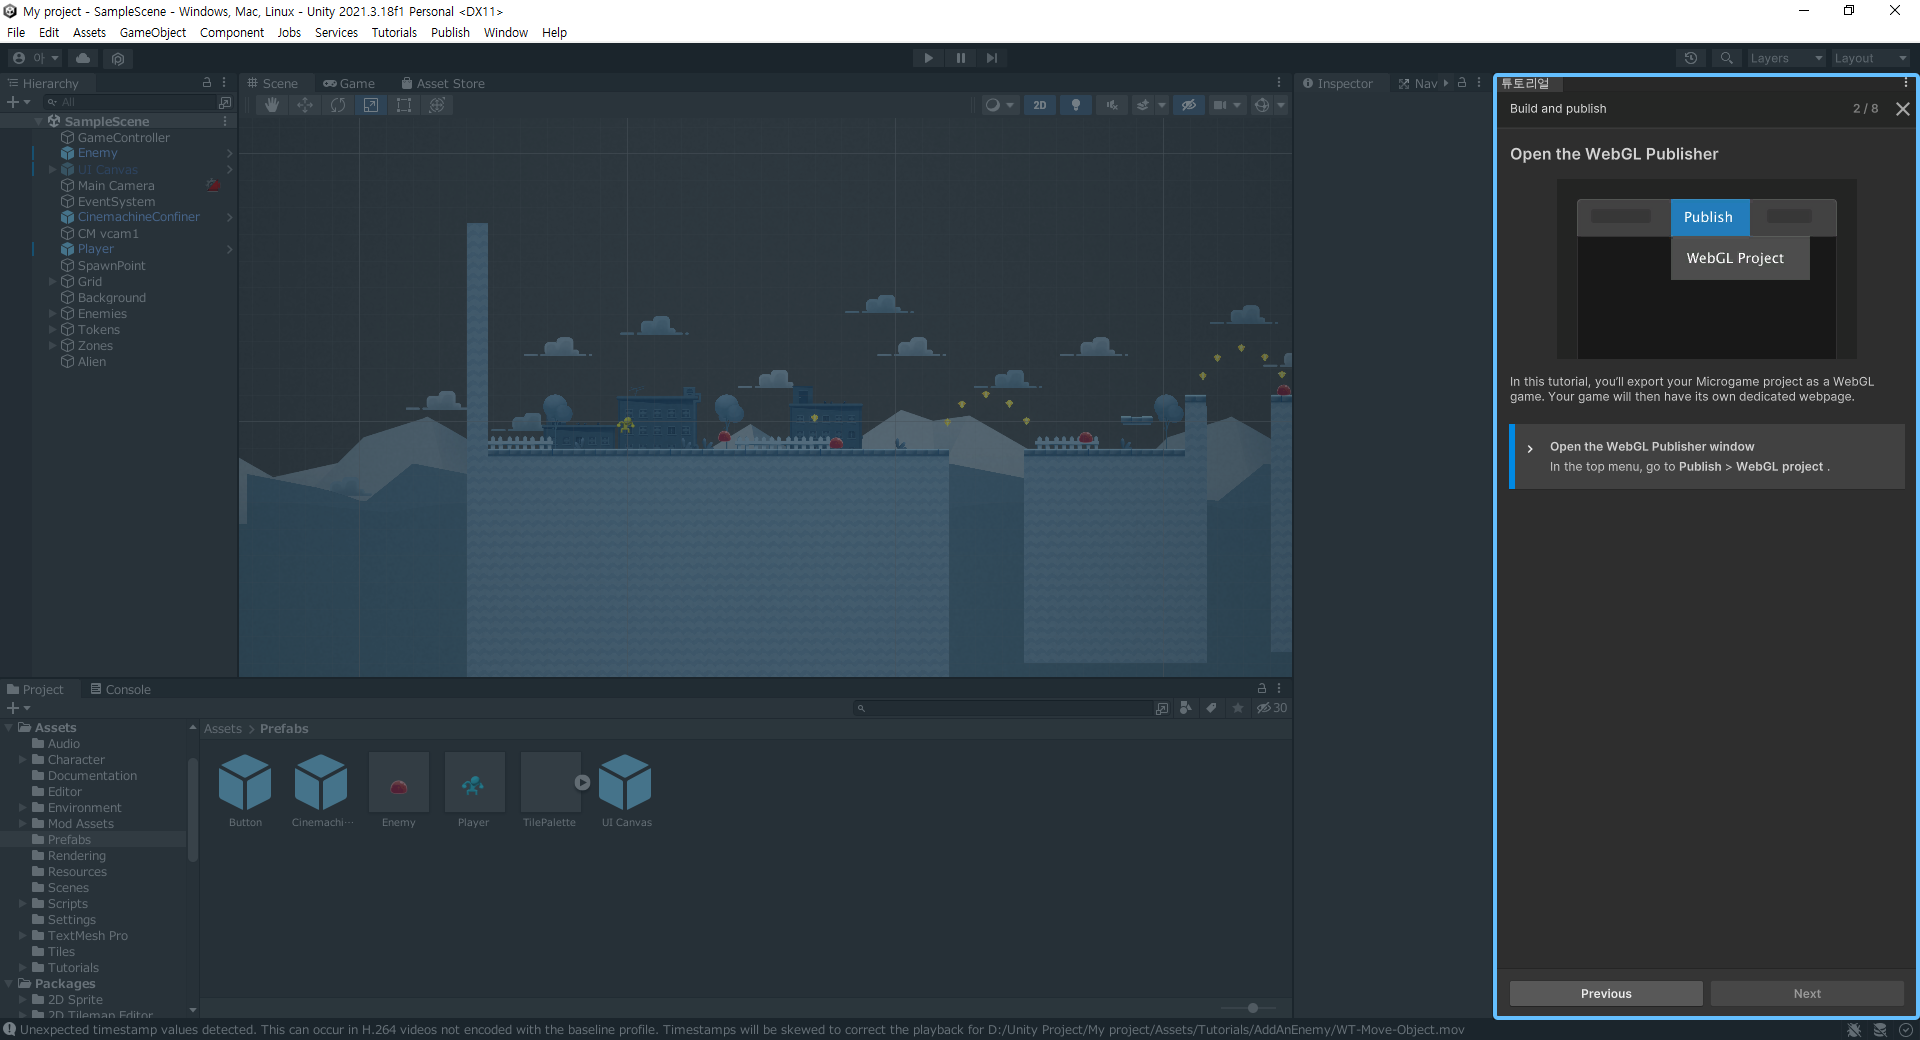
In this tutorial, you'll export your Microgame project as a WebGL game. Your game will then have its own dedicated webpage.
이 튜토리얼에서는 Microgame 프로젝트를 WebGL 게임으로 내보냅니다. 그러면 게임에 전용 웹 페이지가 나타납니다.
>
Open the WebGL Publisher window
WebGL Publisher 창 열기
In the top meau, go to Publish > WebGL project.
상단 메뉴에서 Publish > WebGL project로 이동합니다.
3. WebGL Publisher 열기
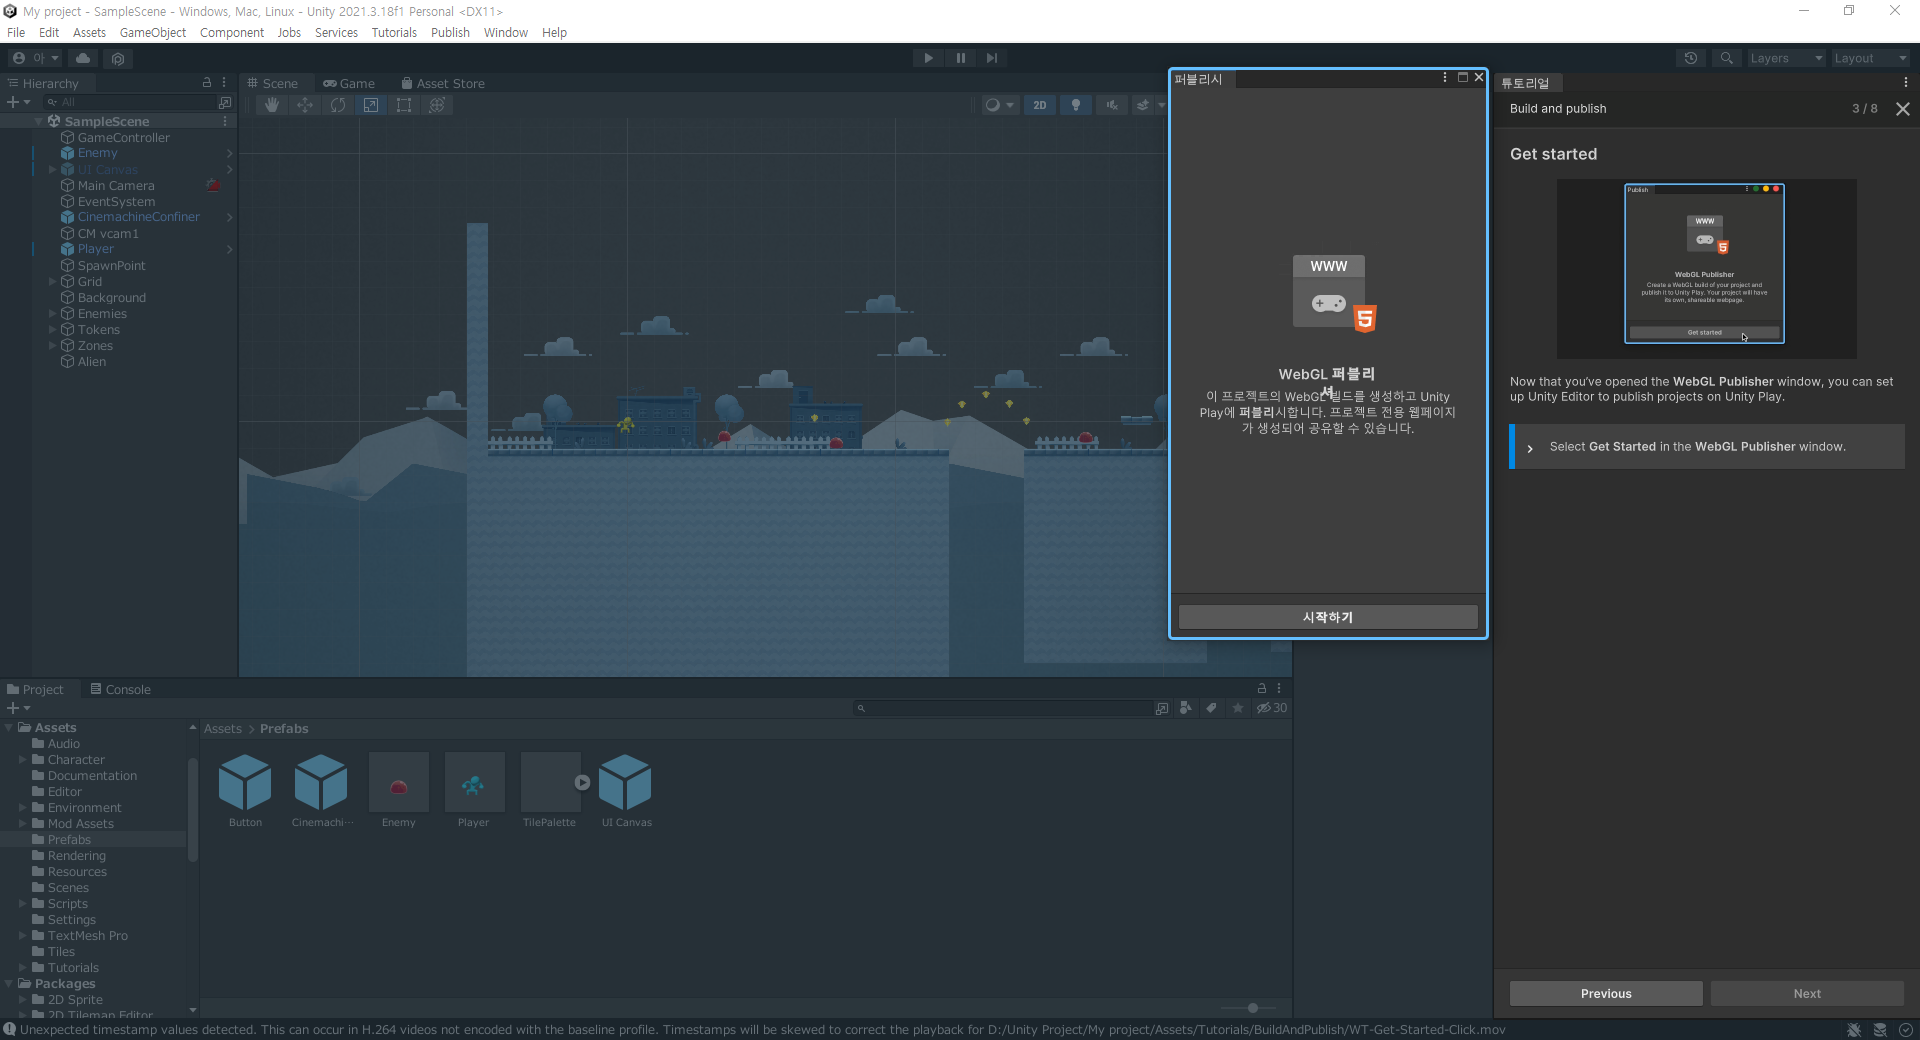
Now that you've opened the WebGL Publisher window, you can set up Unity Editor to publish projects on Unity Play.
WebGL Publisher 창을 열었으므로 Unity Editor를 설정하여 Unity Play에서 프로젝트를 게시할 수 있습니다.
> Select Get Started in the WebGL Publisher window.
> WebGL 게시자 창에서 Get Started(시작하기)를 선택합니다.
4. 게임 구축
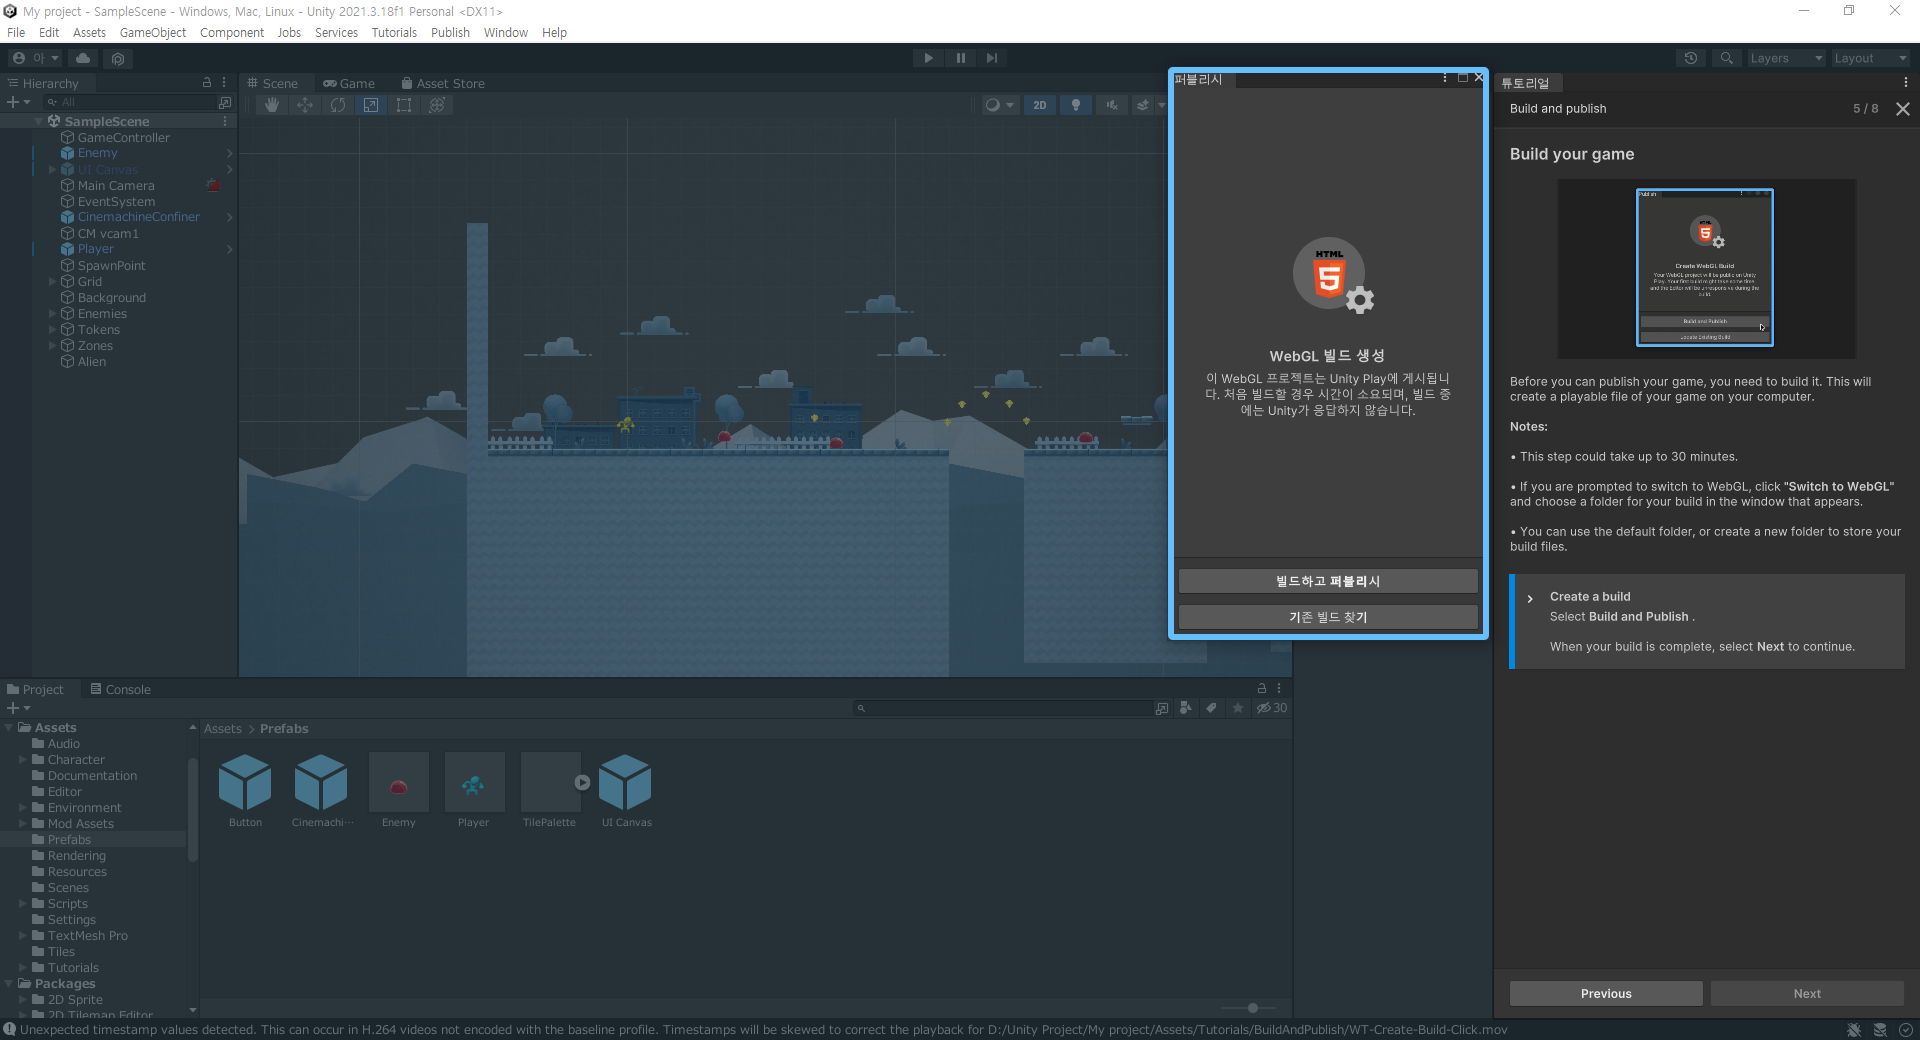
Before you can publish your game, you need to build it. This will create a playable file of your game on your computer.
게임을 게시하려면 먼저 게임을 빌드해야 합니다. 이렇게 하면 컴퓨터에 게임의 재생 가능한 파일이 만들어집니다.
Notes:
주의:
- This step could take up to 30 minutes.
이 단계는 최대 30분이 걸릴 수 있습니다. - If you are prompted to switch to WebGL, click 'Switch to WebGL' and choose a folder for your build in the window that appears.
WebGL로 전환하라는 메시지가 표시되면 'WebGL로 변경'을 클릭하고 표시되는 창에서 빌드할 폴더를 선택합니다. - You can use the defauit folder, or create a new folder to store your build files.
기본 폴더를 사용하거나 새 폴더를 만들어 빌드 파일을 저장할 수 있습니다.
>
Create a build
빌드 생성하기
Select Build and Publish.
'빌드하고 퍼블리시'를 선택합니다.
When your build is complete, select Next to continue.
빌드가 완료되면 다음을 선택하여 계속하십시오.
5. 게임 공유
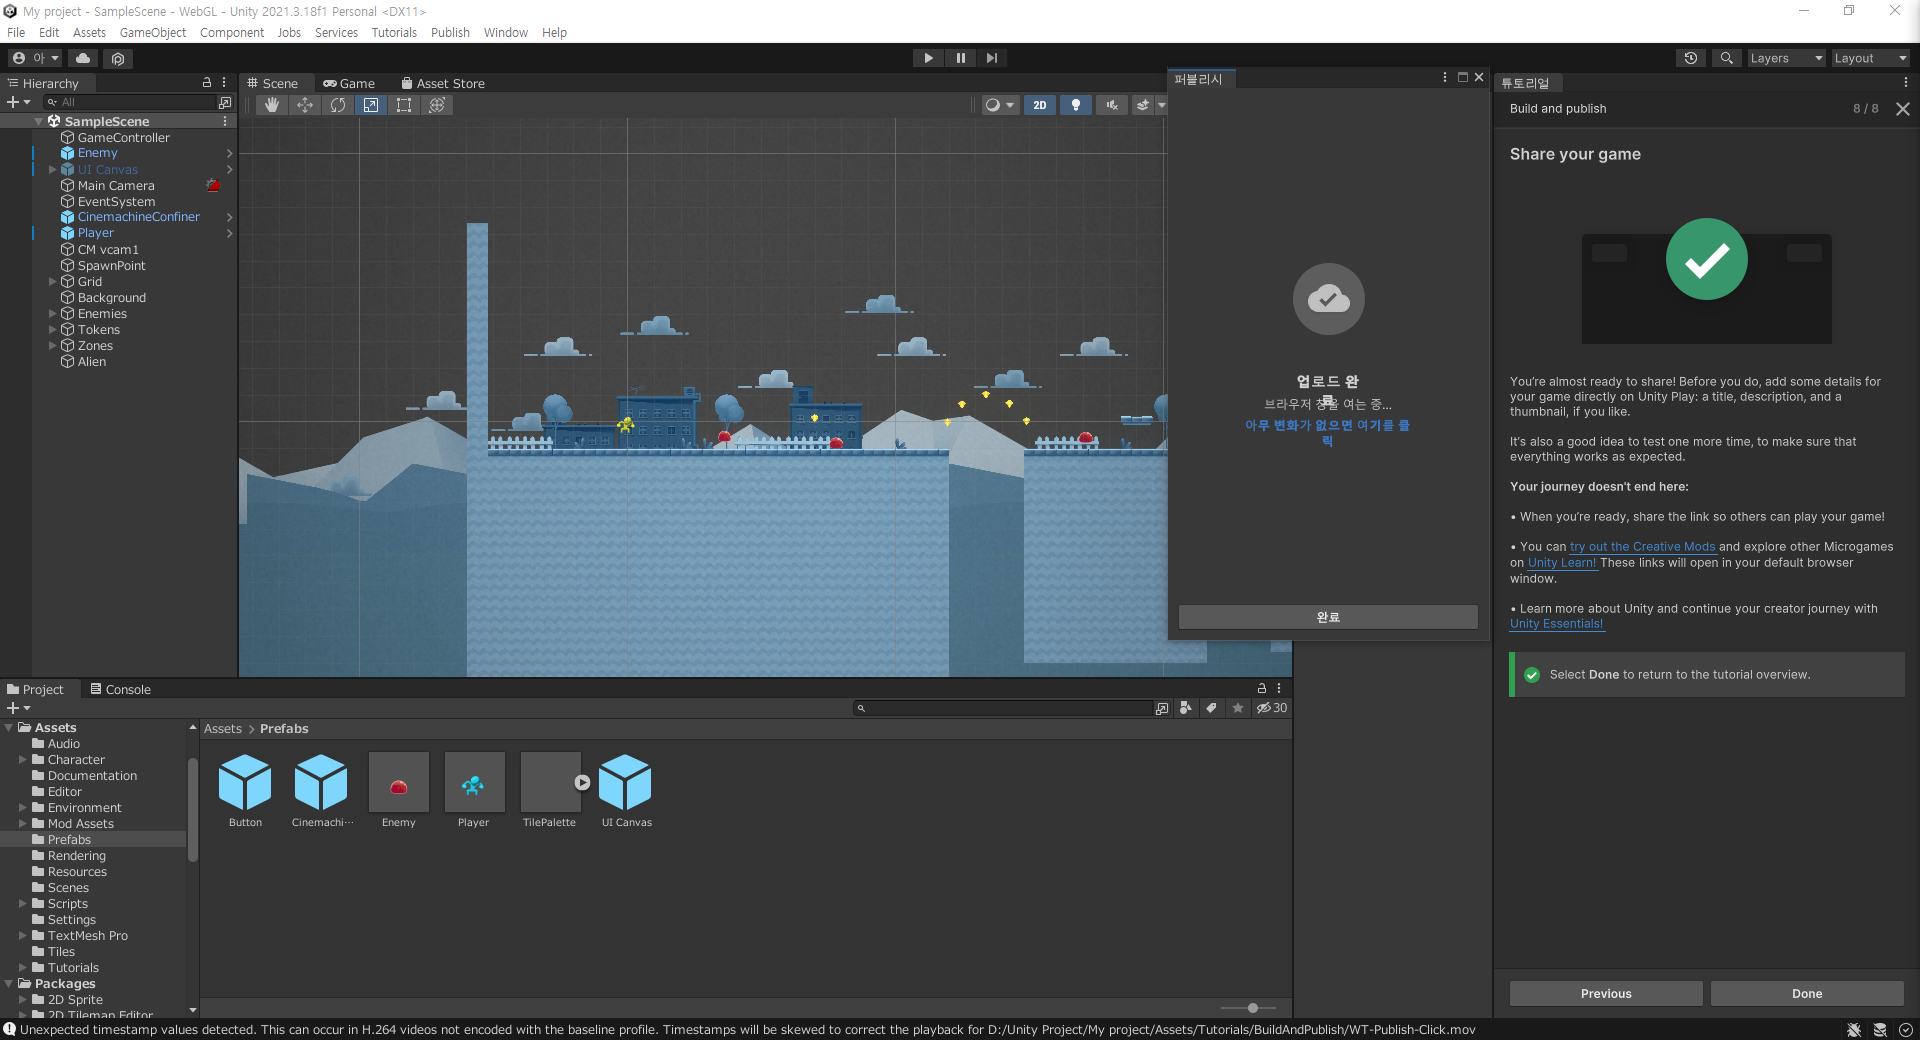
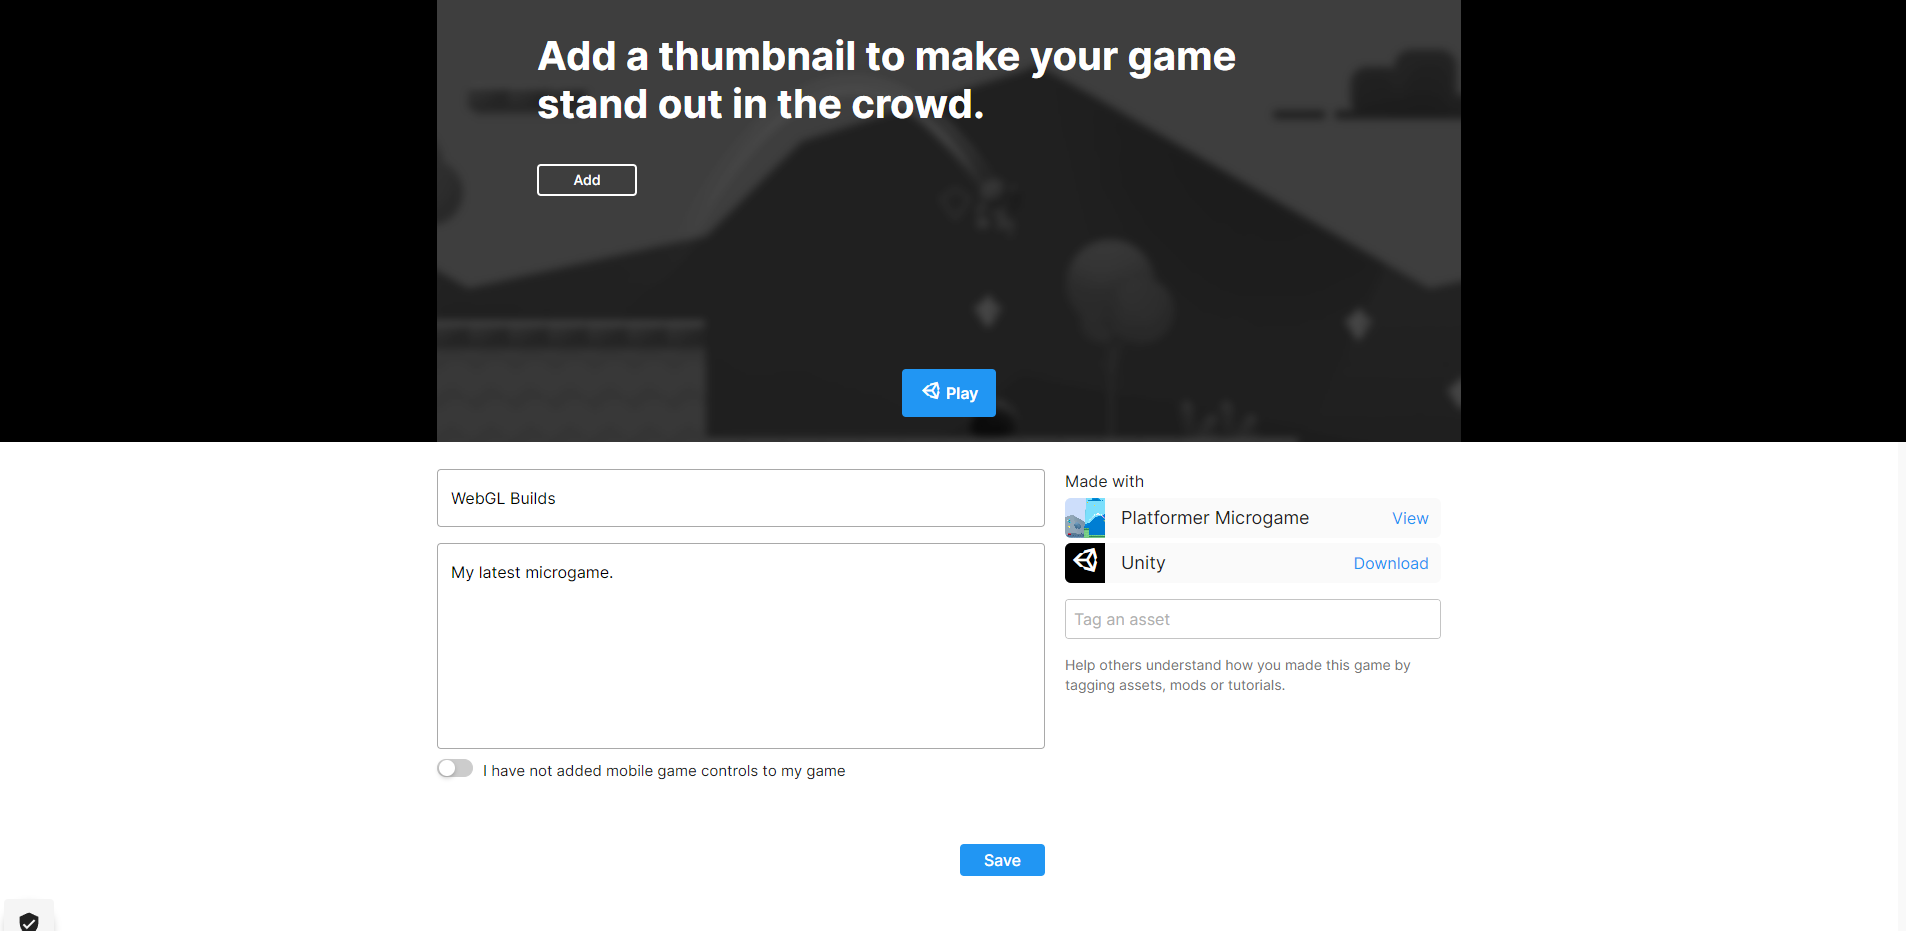
You're almost ready to share! Before you do, add some details for your game directly on Unity Play : a title, description, and a thumbnail, if you like
공유할 준비가 거의 다 되었습니다! 먼저 Unity Play에서 게임에 대한 세부 정보를 직접 추가합니다 : (원하는 경우) 제목, 설명 및 썸네일
It's also a good idea to test one more time, to make sure that everything works as expected.
모든 것이 예상대로 작동하는지 확인하기 위해 한 번 더 테스트하는 것도 좋은 방법입니다.
Your journey doesn't end here:
여행은 여기서 끝나지 않습니다:
- When you're ready, share the link so others can play your game!
준비가 되었으면 다른 사용자가 게임을 실행할 수 있도록 링크를 공유하십시오! - You can try out the Creative Mods and explore other Microgames on Unity Learn! These links will open in your default browser window.
당신은 크리에이티브 모드를 사용해보고 유니티 러닝에서 다른 마이크로게임들을 탐험할 수 있습니다! 이러한 링크는 기본 브라우저 창에서 열립니다. - Learn more about Unity and continue your creator journey with Unity Essentials!
Unity에 대해 자세히 알아보고 Unity Essentials로 크리에이터 여정을 계속해 보십시오!
'Unity' 카테고리의 다른 글
| [Unity] 유니티 프로그램 알아야될 화면 구성 (0) | 2023.02.28 |
|---|---|
| [Unity] 튜토리얼 한글 정리 (2D Platformer Microgame - Add an enemy [적 추가하기]) (0) | 2023.02.27 |
| [Unity] 튜토리얼 한글 정리 (2D Platformer Microgame - Change colors[색상 변경]) (0) | 2023.02.27 |
| [Unity] 튜토리얼 한글 정리 (2D Platformer Microgame - Editor basics[편집기 기본사항]) (0) | 2023.02.26 |
| [Unity] 튜토리얼 한글 정리 (2D Platformer Microgame - Get started) (0) | 2023.02.26 |


